by Team Codeasify
3398

We hope that you have a basic understanding of what Git is. If you don't know and want to learn "what is git?" please check out this.
Basically, Git is a version control system that allows developers/programmers to manage and track changes to their codebases (especially when we have multiple team members).
Table of Contents
The following are the top ten most commonly used Git commands that every developer should know.
1. Git init
In simple words, `git init` creates/initializes a Git repository in your current working directory. Any other commands can only be run after running this command, which means this is the very first command you have to run to work with Git.
Actually, it will create a subdirectory in your current working directory named `.git`. Which contains your all tracking information.
How to use "git init"?
Command usage:
git initHere we can see the demo

As we can see we got the ".git" subdirectory after running git init.
2. git clone
`git clone` is the command to download an existing source code from a remote repository like (GitHub, GitLab, BitBucket and etc..) into your local system.
It will create a directory of the same name as we have in our remote repository. And copy all the code inside that directory.
How to use "git clone"?
Command usage:
git clone https://link-to-your-repository.gitOkay, that's fine, but where are we getting this link from?
Go to repository > Click on green Code button > Copy HTTPS link
To get this link see the below image:
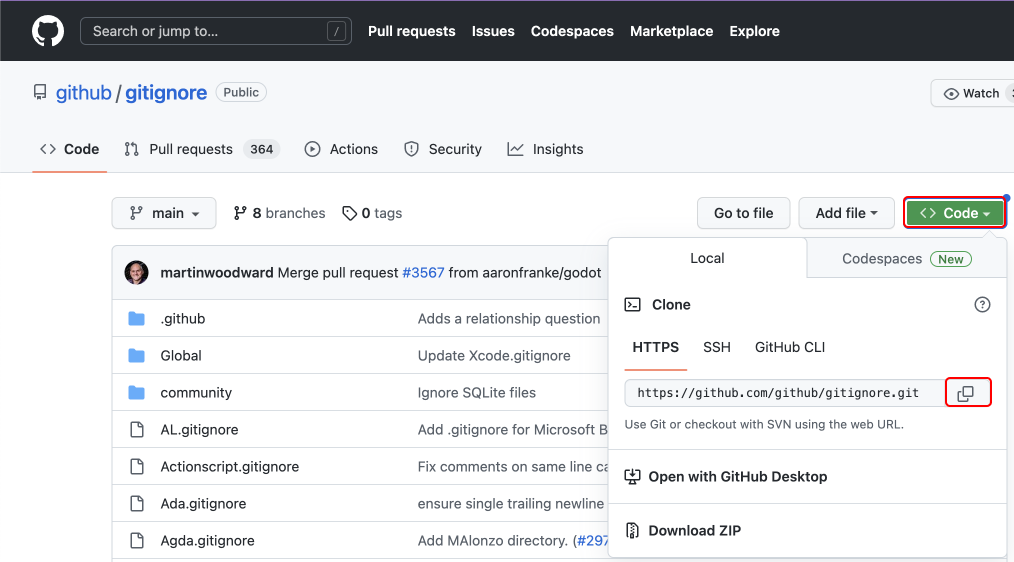
Here is the demonstration of cloning a repository

3. git status
With `git status` we can check the status of the current git repository and whether your git repository is updated as your current working directory code.
It shows various things about the local git repository
-
This shows the files that have been modified in our working directory in comparison with the git repository staging area.
-
Files that are untracked.
-
Your current working branch.
-
And many more
How to use "git status"?
Command usage:
git statusHere is the demonstration of the git status command.

4. git add
This command `git add` is used to add the untracked, modified, newly created, and deleted files into the git staging area.
But why?
As long as a file is in the staging area, then whenever we commit, all staging files will be tracked by the commit command. Without adding them to the staging area, they cannot be committed.
How to use "git add"?
We have two options to use the `git add` command.
- Add all files in one go
- Add files manually one by one
Command usage:
# Add all files in one go
git add -A

# or

git add .


# Add files one by one manually
git add <file_name>
Here is the demonstration for adding all files in one go for the git add command
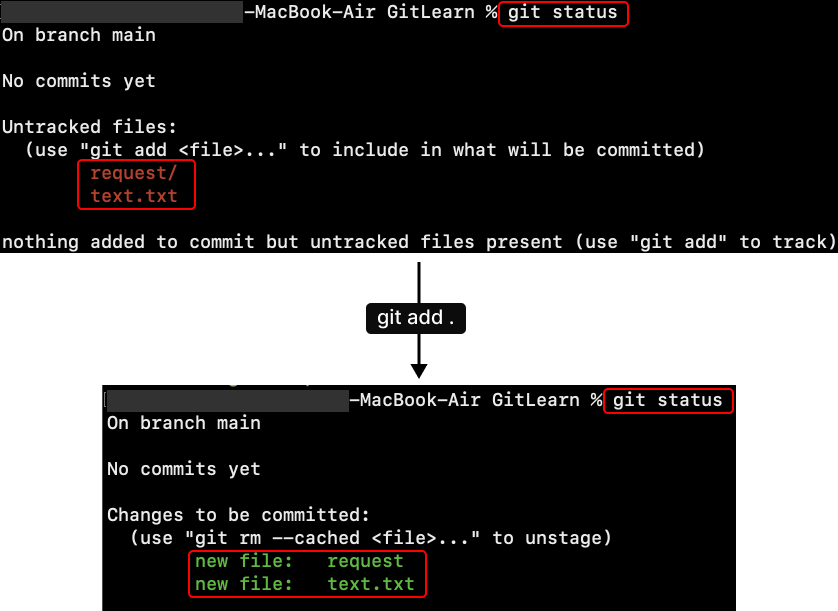
5. git commit
Let's take a closer look at this command. To save the changes that are present in the staging area to your git repository, we use the `git commit` command.
Think of it as a checkpoint for our changes so far. And every commit needs to have a tag/message (like a description of your changes) to make it more understandable for future team members and for ourselves also.
How to use "git commit"?
Command usage:
git commit -m <your commit message/tag>Here is the demonstration of saving changes from staging to the git repository using git commit command.
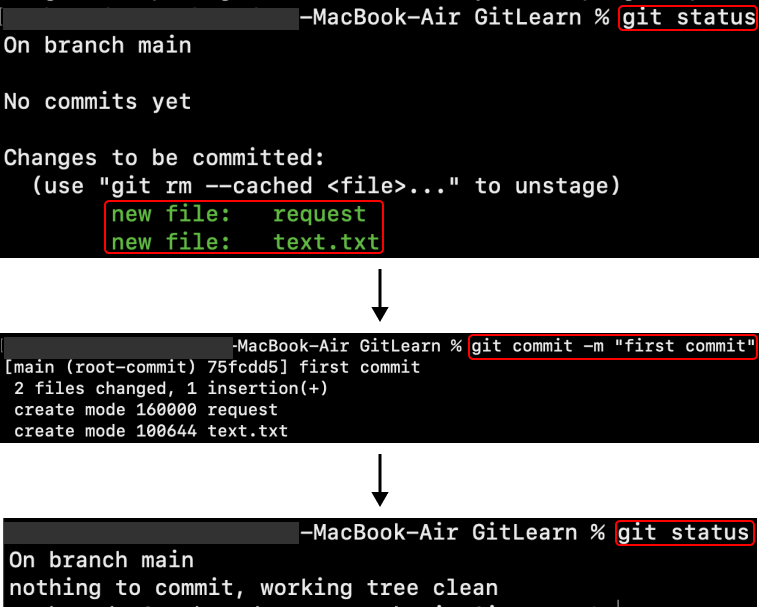
6. git push
As the name suggests, `git push` pushes code from a local git repository to a remote server repository (such as GitLab, GitHub, or BitBucket).
Note: The only committed changes will be pushed to the remote server repository by this command.
How to use "git push"?
This command can be used in multiple ways, but here we will focus on one method.
Command usage:
# For the first time pushing a new branch
git push -u origin <your_branch_name>

#or

git push --set-upstream origin <your_branch_name>


# For the second time, third time, etc.
git push
Here is the demonstration for pushing a new branch to the remote repository.
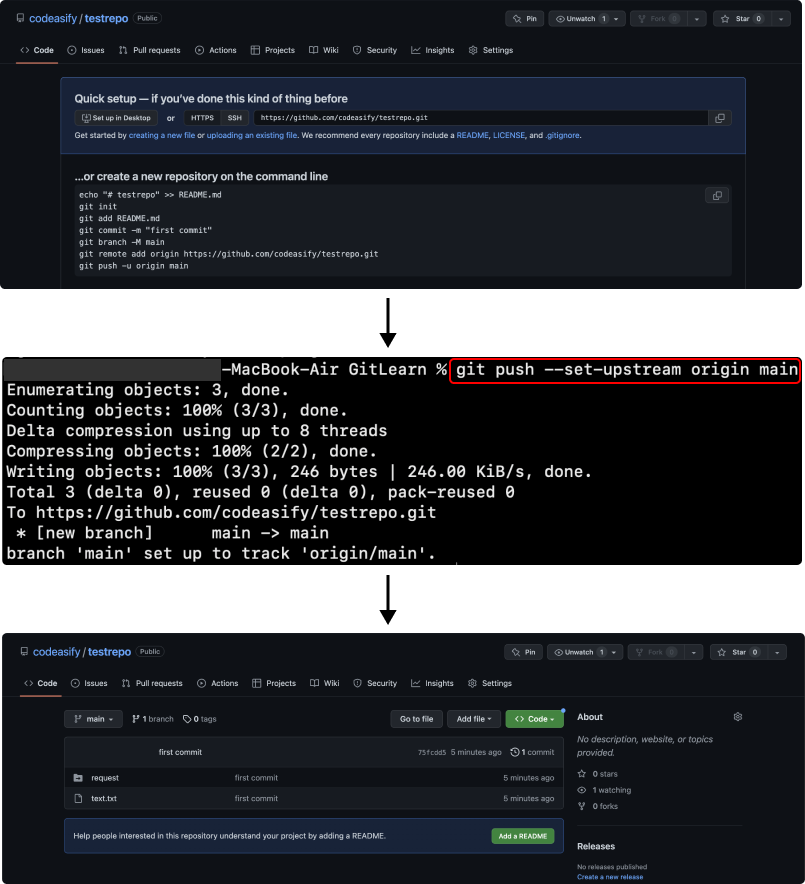
7. git branch
This command is related to branching, and branching is a very important and broad topic.
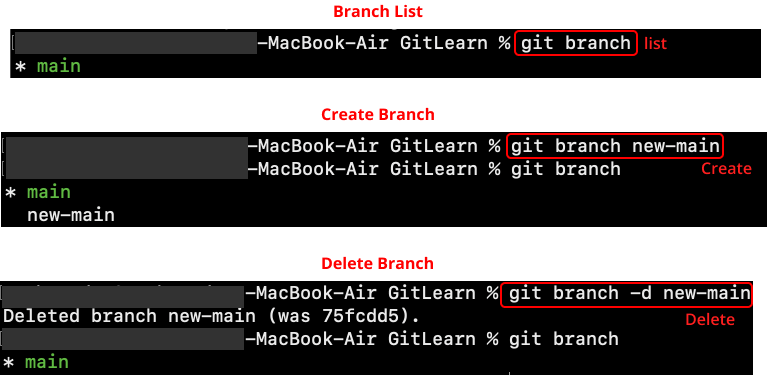
`git branch` command is used to list, create, and delete the branches of your local git repository.
How to use "git branch"?
command usage:
#To list all the branches
git branch

# To create a new branch
git branch <branch_name>

# To delete a branch
git branch -d <branch_name>
Here is the demonstration for the git branch command.
8. git checkout
This command is related to branches.
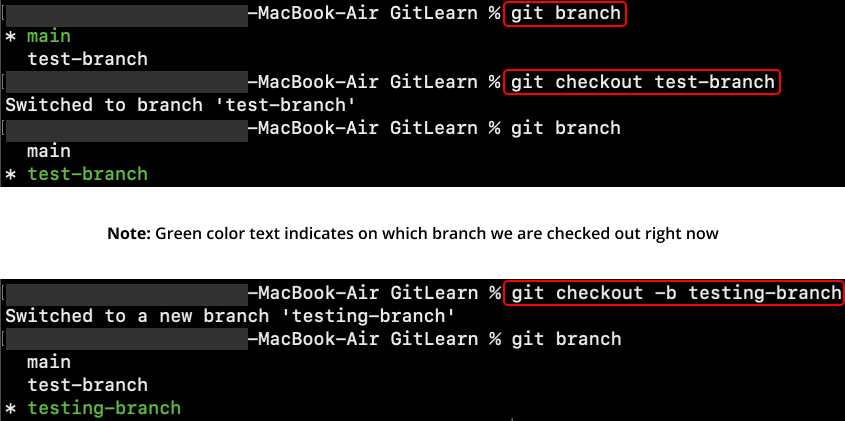
`git checkout` is used to switch from one branch to another existing branch or we can create a branch at the time of switching with `git checkout -b <branch>`.
How to use "git checkout"?
command usage:
# checkout to existing branch
git checkout <branch_name>


# Checkout and create a new branch
git checkout -b <branch_name>
Here is the demonstration for the git checkout command.
9. git merge
By using `git merge`, you can merge your newly created or modified child branch with the parent branch.
If you have completed your changes and development in the child branch, you must merge it into your parent branch to apply them to the entire project code base.
How to use "git merge"?
Command usage:
git merge <branch_name>Here is the demonstration for the git merge command.

10. git pull
`git pull` is used to pull (updated code) from the remote server repository to the local repository. It is a combination of two commands, git fetch and git merge. Initially, it will fetch the code and then merge it with the current branch.
Note: Merge command in this process may create conflicts then you have resolved them manually.
How to use "git pull"?
Command usage:
git pull

#or
git  pull origin

#or
git pull origin <branch_name>
Here is the demonstration for the git pull command.

Hope you like all these commands.
Please share this blog with others as well. You can subscribe to our newsletter to receive such amazing updates directly in your inbox.